Operation of the Eldex Hydrolysis/Derivitization Workstation for Liquid- and Vapor-Phase Hydrolysis
4.1 INTRODUCTION
The Eldex (Eldex Laboratories, Inc. 30 Executive Court Napa, CA 94558-6278 USA) Hydrolysis/Derivatization WorkStation (H/D WorkStation – formerly the Pico-Tag workstation) is a stand-alone unit that provides reliable and consistent hydrolysis and pre-column derivatization of samples undergoing amino acid analysis. The workstation provides all the functions for vapor-phase protein or peptide hydrolysis.
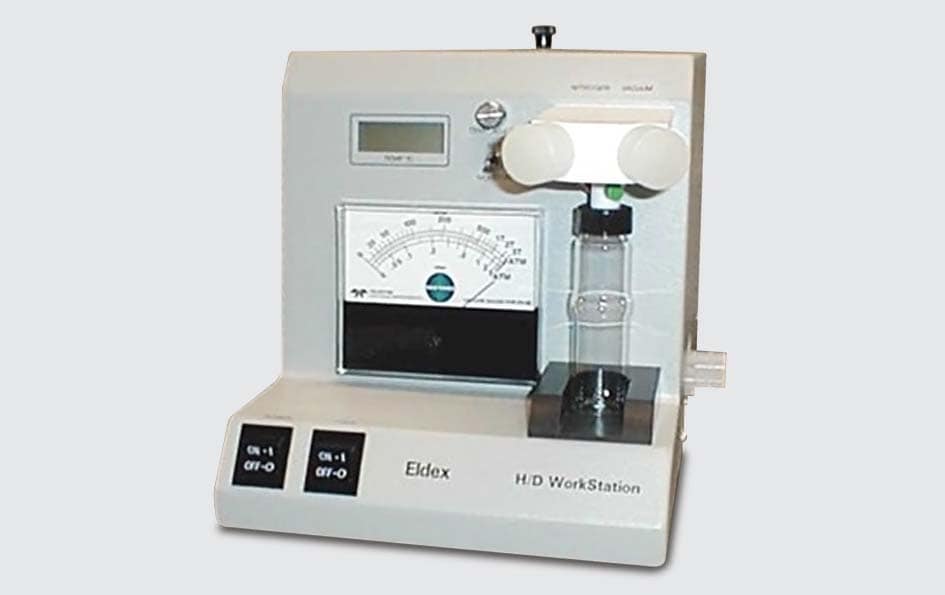
Figure 6. Eldex worstation.
This section briefly outlines the setup and operation of the workstation. For further information, consult the Eldex workstation manual.
4.2 PHYSICAL REQUIREMENTS
The unit requires vacuum and nitrogen connections.
A Dewar flask and cold finger are provided as part of the workstation. The Dewar requires dry ice.
The unit’s reaction vial assemblies can accommodate up to 12 sample tubes simultaneously.
4.3 REAGENTS REQUIREMENTS
- 6 N HCl with 1% phenol by volume
- Nitrogen (pre-purified grade)
- Methanol
- Dry ice
4.4 SAMPLE PREPARATION
- Clean the sample tubes with an acid such as 6 N HCl. Rinse them thoroughly with water, and then with 100% (undenatured) ethanol. Dry them under vacuum. For identification purposes, the sample tubes may be scribed with a diamond pencil before they are placed in the reaction vial.
- Use a syringe or micropipette to place a solution containing 0.5–10 µg of the sample into the sample tubes. As many as 12 sample tubes can be placed in a single reaction vial. The sample tubes should be handled with Teflon® forceps or with plastic gloves to prevent contamination by skin contact.
- To allow the oven to equilibrate, set it to 105 °C for 20–30 minutes before performing the hydrolysis.
4.5 EVAPORATION OF SOLUTION TO DRYNESS
- Place dry ice in the Dewar flask around the cold finger. Carefully add methanol or 2-propanol to the cold trap.
- Turn on the vacuum pump.
- Screw the reaction vial cap onto the vial. Slide the button on the cap to the open (green in) position.
- Install the reaction vial onto the WorkStation by positioning the top of the vial in the vacuum port and sliding the bottom of the vial in toward the WorkStation on the black “shoe”.
- Open the vacuum valve.
- Once the vacuum gauge reaches about 65 millitorr, the samples are properly evaporated.
- For additional drying, allow the system to stay at this reading for several minutes.
- Close the vacuum valve and remove the reaction vial from the WorkStation. Unscrew the cap from the vial.
- Add 200 µL of HCl/phenol to the bottom of the vial. Take care not to introduce the HCl directly into any of the tubes.
- With the reaction vial cap in the open (green in) position, screw the cap onto the vial and install the vial onto the WorkStation.
4.6 VACUUM-NITROGEN CYCLE
- Verify that the nitrogen valve is closed and carefully open the vacuum valve until the vacuum gauge reads about 1–2 Torr and the HCl begins to bubble. The procedure takes about 20–30 seconds.
- Close the vacuum valve.
- Open the nitrogen valve and purge for five seconds. Close the nitrogen valve.
- Repeat the vacuum nitrogen cycle three times. Leave the vacuum valve open after the final cycle.
- Do not evaporate the acid to dryness. If the vacuum gauge falls below 500 millitorr, discontinue purging.
4.7 CONTINUATION
- While the vial is under vacuum, close the vial cap valve (red in).
- Close the vacuum valve and remove the vial from the WorkStation.
- Place the reaction vial in the oven. Use gloves or forceps to avoid contact with the oven interior.
- You can now turn off the vacuum and nitrogen systems of the WorkStation.
4.8 REMOVAL OF EXCESS HCl
- After 20–24 hours, remove the vial from the oven to cool. Open the vial cap valve (green in). Remove the reaction vial cap and carefully remove the sample tubes with Teflon- coated forceps. Use laboratory wipes to remove the HCl from the outside of each tube.
- Transfer the sample tubes to a fresh reaction vial.
- Screw a reaction vial cap onto the vial.
- Open the vial cap valve (green in). Install the reaction vial onto the WorkStation and carefully open the vacuum valve.
- Once the vacuum gauge reaches about 65 millitorr, the samples are properly evaporated.
- For additional drying, allow the system to stay at this reading for several minutes.
4.9 DERIVATIZATION
The samples are ready for derivatization. The sample can be reconstituted in 0.1 M HCl and prepared for derivatization by means of the Waters AccQ•Tag Method. For further information, consult the section below that describes post-hydrolysis sample handling.